How do I plan my storyline?
How to turn your argument into slide headlines, supporting content, and notes in Outline.
Updated 17 November 2026
Introduction
In the Outline step, your argument becomes a storyline: one card for each slide, in presenting order. You write every word of the deck here. Design lays the words out.
Outline opens once your answer has one supporting point in Argue. Select Next: Outline at the bottom of Argue, or press ⌘⏎ (Ctrl+Enter).
How to
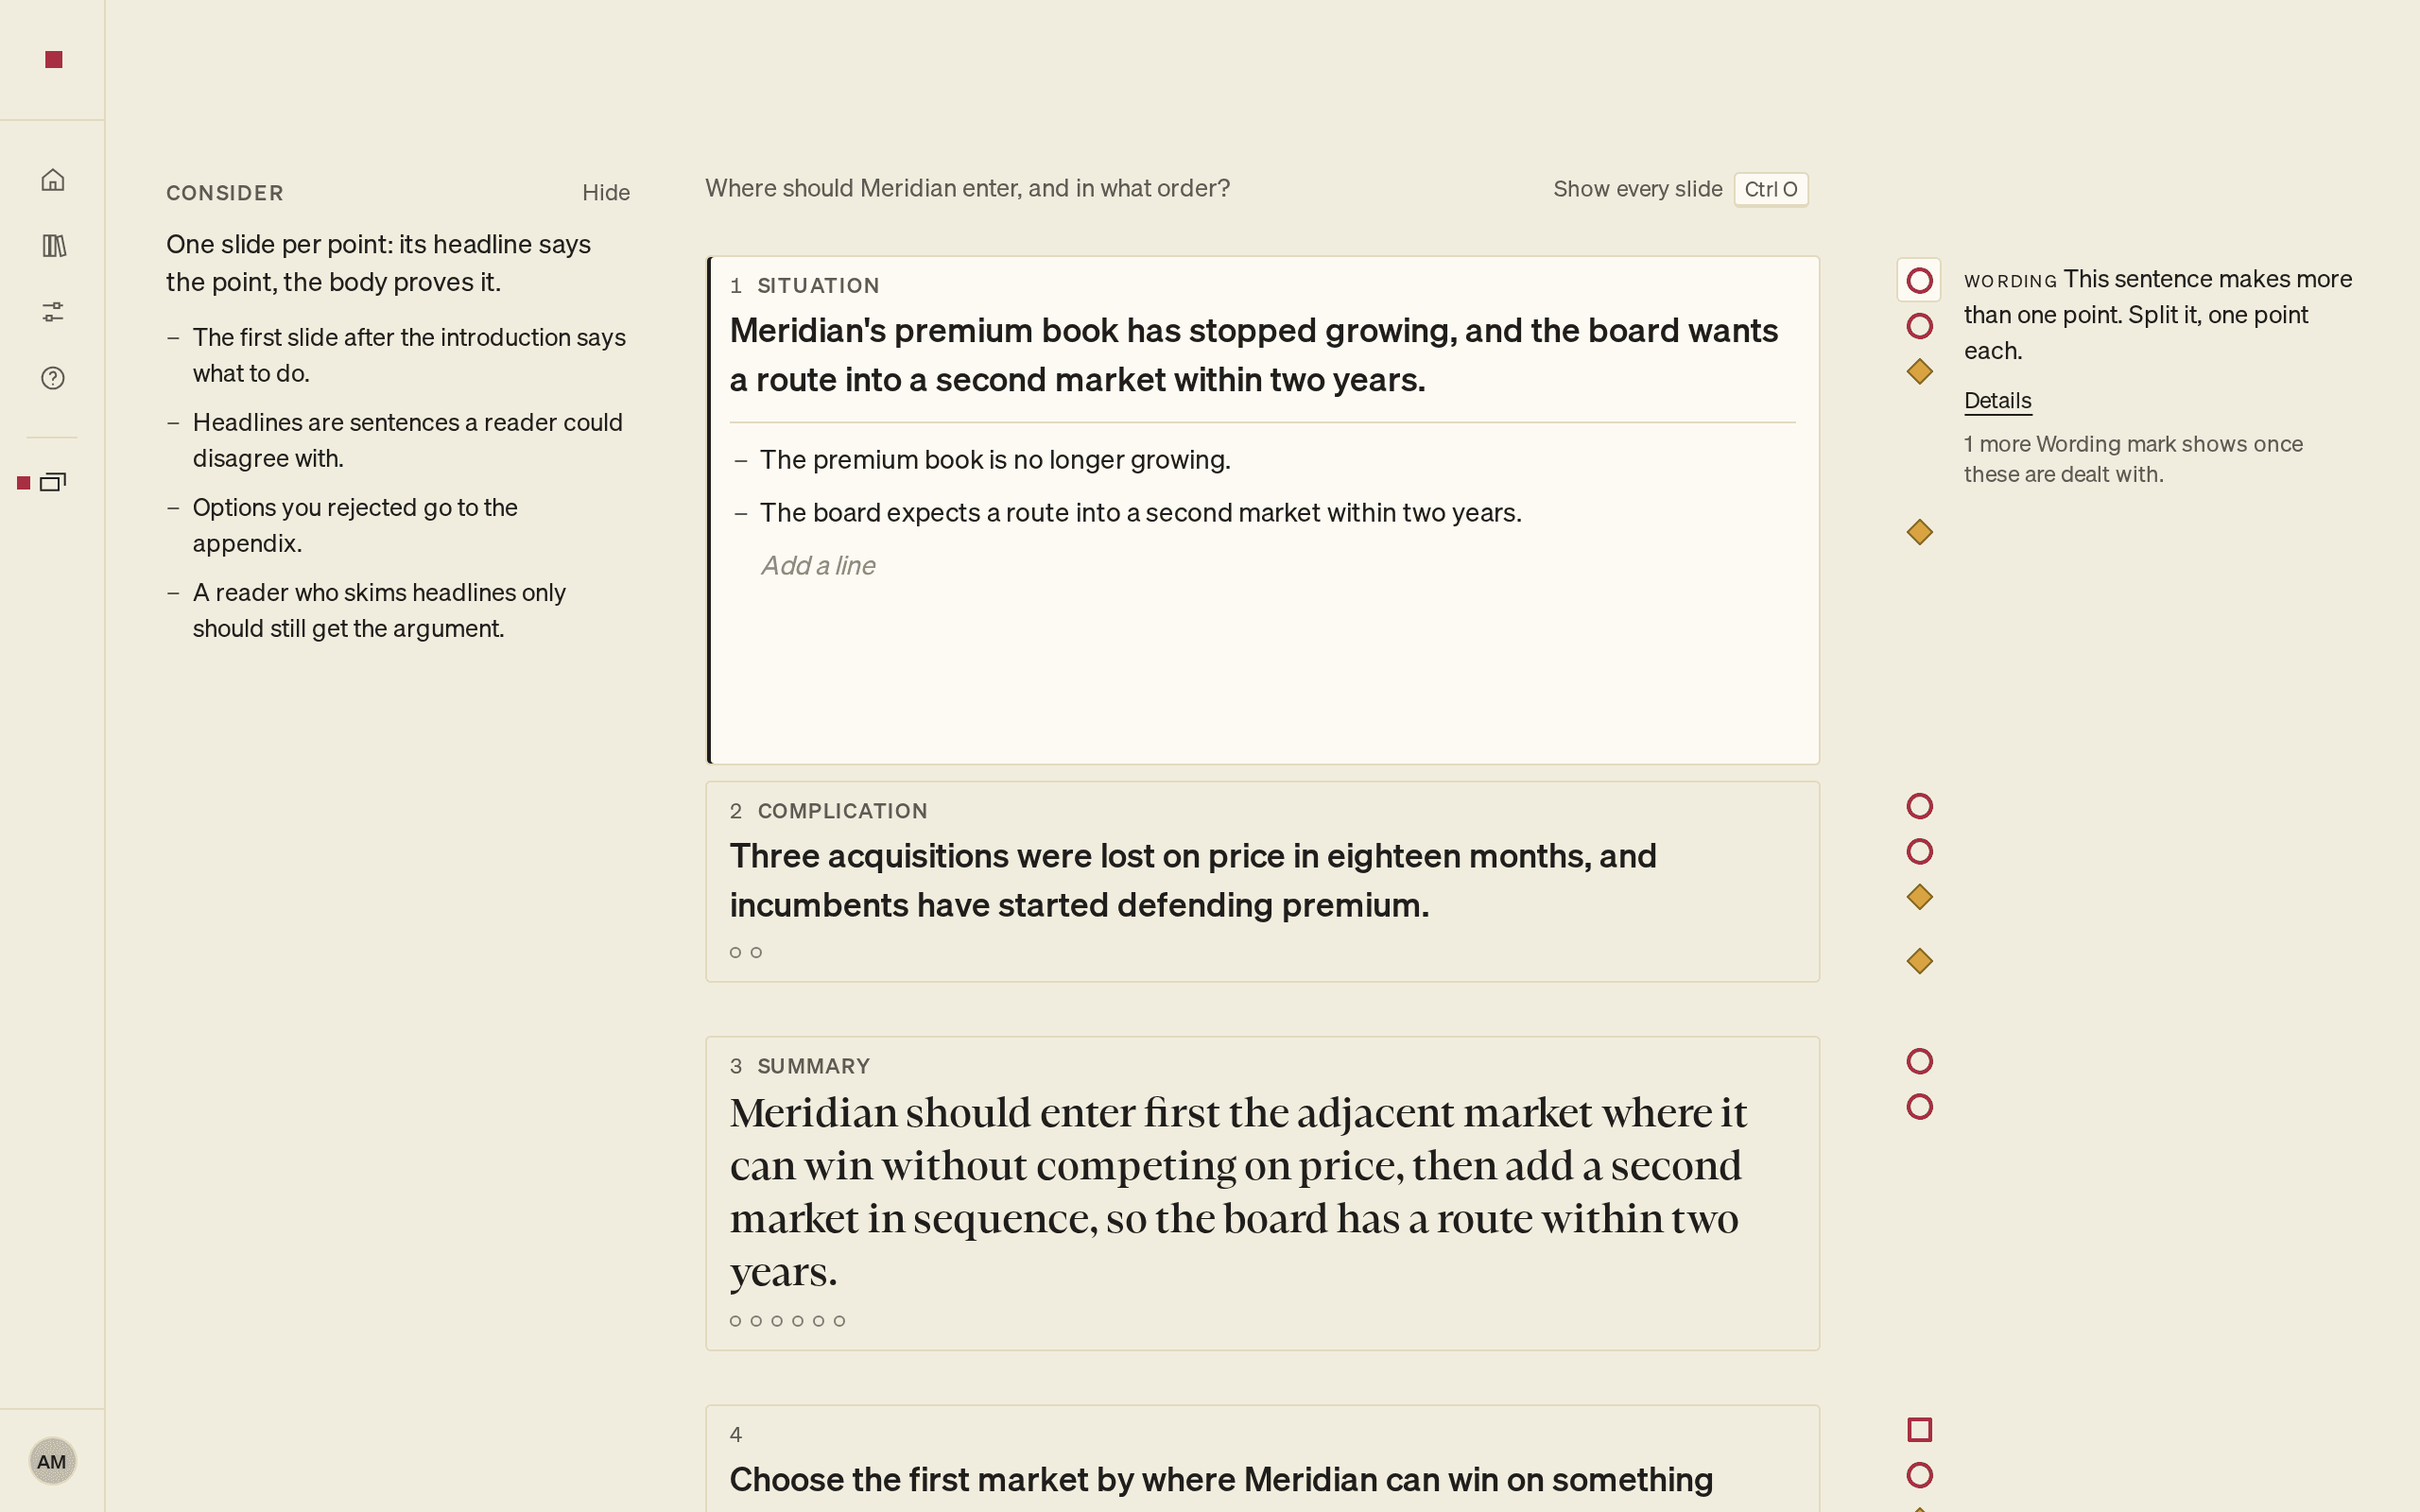
Use Consider
On your first visit, Consider sits in the left margin with a few prompts for the storyline, by the kind of presentation you chose in Frame. On a narrow window it sits above the slides instead. The prompts are written guidance, not AI suggestions.
- To put it away, select Hide. PointProven remembers this for the deck in this browser.
- After your first change, it folds to one line, for example Consider · 4 prompts. Select the line to open it again.
- To open it from the keyboard, press ⌘K (Ctrl+K) and choose Open Consider. The same menu has Hide Consider.
Consider has no shortcut of its own in Outline. ⌘O (Ctrl+O) shows every slide.
Review the AI's draft
The first time you open an empty Outline, PointProven drafts one. The right margin shows Drafting your outline with Cancel. Typing stops the draft.
The draft adds lines to each slide from your argument and writes the Situation and Complication slides from your Frame answers. It suggests Next steps actions but leaves the owners and deadlines to you. The margin says Next steps need an owner and a date from you. It never writes over your words.
When the draft is ready, it fills your outline and is yours to edit at once. There is nothing to take. The margin says Drafted from your argument. ⌘Z (Ctrl+Z) does not take a first draft back.
To clear it and write the slides yourself, select Start from scratch. It is beside the first slide when the draft lands, then in the right column while Outline holds anything. It clears all of Outline, not only the draft, so changes you made after the draft go too:
- If nothing has changed in another step since the draft, the outline goes back to how it was before the draft.
- Otherwise, for example when Argue or Design has changed since the draft, the outline's own lines go to the bin. Lines from your argument stay where they are, and you can also restore the binned lines from the bin.
Either way it is one change, and ⌘Z (Ctrl+Z) brings it all back.
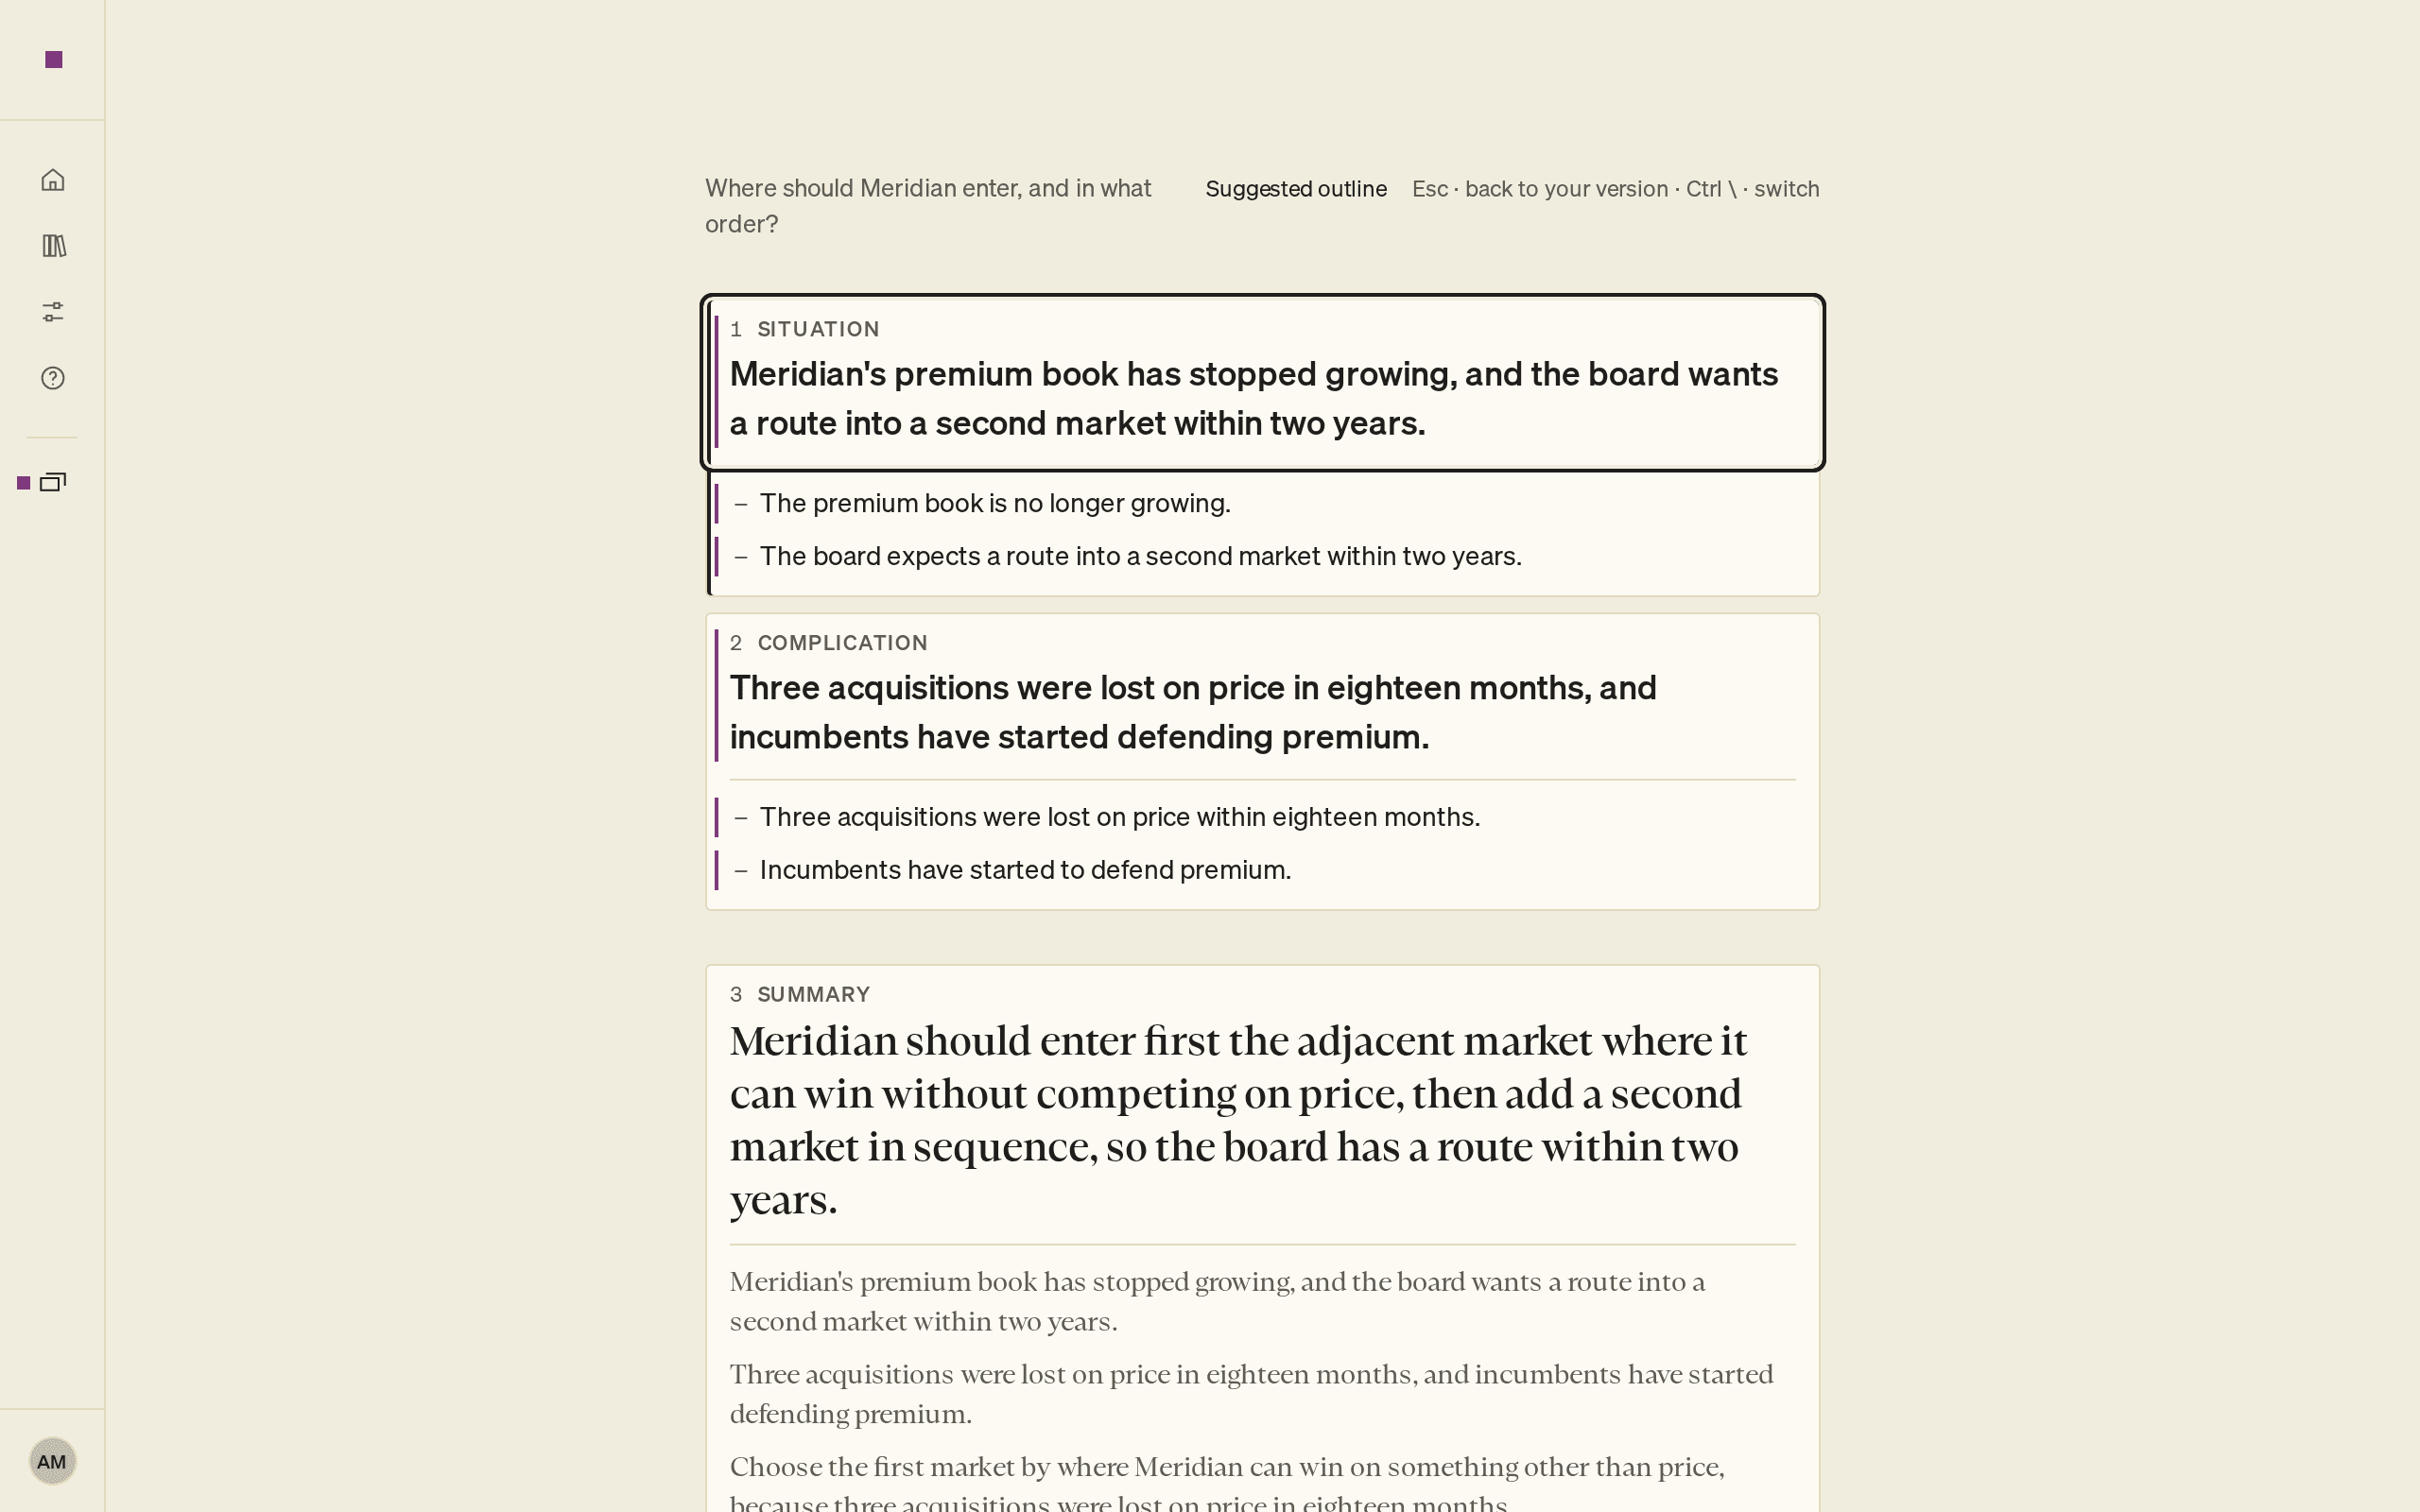
To ask for a draft later, press ⌘K (Ctrl+K) and choose Draft it for me. If your outline already has slides, the draft waits beside the first slide until you select Show the suggested outline. The Suggested outline then shows in place of your page, with each addition marked:
- Read the suggestion. F8 goes to the next change, and ⌘\ (Ctrl+) switches to your version.
- At the foot of the suggestion, select Take this outline or Leave it. Take this outline works once you have reached the foot.
To undo a suggestion you took, press ⌘Z (Ctrl+Z) once.
Put the slides in order
The deck runs Situation, Complication, Summary, one slide for each point, then Next steps. The Appendix follows the main deck. Each point's slide is the same point as in Argue, so a change here shows there too.
- To move a point's slide, select it and press Alt+Shift+↑ or Alt+Shift+↓ (⌥⇧↑ or ⌥⇧↓ on a Mac).
- To open a slide's menu, right-click the slide or press Shift+F10. The menu has Add a slide after, Merge with the slide before and Send to the bin.
- To see every slide's lines at once, select Show every slide or press ⌘O (Ctrl+O).
Merge two slides
Merging changes the point structure in Argue as well as the slides. The later point becomes a sub-point of the point before it, and its slide content folds into that earlier slide. The headlines are not joined into one sentence.
- Select the later point’s slide.
- Right-click it, or press Shift+F10, to open its menu.
- If the menu offers Merge with the slide before, select it.
The point keeps its evidence, marks, and sources. Its sub-points become sub-points of the earlier point, beside it. Any extra slides move to the earlier point, and the merged slide’s notes move to the receiving slide. If the earlier point had evidence, that evidence moves beneath the point you merged in.
You cannot merge the first point’s slide, introduction slides, Summary, Next steps, appendix slides, or extra slides this way. To undo the change, press ⌘Z (Ctrl+Z).
Read the marks in the margin
Outline checks your words as you write. Each mark in the right margin has a shape, and the category word leads its finding: Structure (square), Logic (triangle), Wording (circle), Sources (diamond) and Evidence (hexagon). Outline is the first step that checks Wording, such as a headline that does not start with what to do. More checks arrive during the beta.
To keep the margin readable, a slide shows at most two Wording, Sources or Evidence marks at a time. A line says what is held back, for example "2 more Wording marks show once these are dealt with." Fix the marks you can see and the next ones appear. For what each mark means, see What each indicator means.
Write the executive summary
The Summary slide follows the Situation and Complication slides. Its headline is your answer. Its lines are the headlines of your other slides, so it always matches the deck. To change a summary line, edit the headline it comes from.
Add Next steps
The Next steps slide ends the main deck.
- On the Next steps slide, select Add an action and type what needs doing.
- Press Tab to move through the fields: Responsible, Accountable, Consulted, Informed and Deadline.
An empty Responsible field shows Who owns it? in grey, and an empty Deadline shows By when?. These prompts are not part of the slide and do not export. A check flags any action with no one responsible or no deadline.
Move detail to the appendix
- Right-click a line, or select it and press Shift+F10.
- Choose Move to appendix.
The line becomes an appendix slide, numbered A1, A2 and so on. Its old place reads See appendix A1. Give the new slide a headline. To undo the move, open the appendix slide's menu and choose Move back from the appendix.
Write speaker notes
- Open a slide card.
- Point to the card. A Speaker notes field appears under its lines.
- Type what you will say over the slide. Press Enter for a new line.
- Press Esc when you finish.
The slide's menu also has Add speaker notes. Deliver lets you export with or without your notes.
Keep or redraft an introduction slide
If you change your Situation or Complication in Frame, that slide shows May be outdated.
- To keep the slide, select Keep.
- To get a new version, select Redraft, then Take the redraft or Leave it. Taking it sends your old lines to the bin. One undo brings them back.
Check it is ready for Design
Design opens as soon as one slide has a line. You can come back to Outline at any time.
Before you finish your outline, check that:
- Every slide has a short headline, and no check asks you to shorten it.
- No slide says Split it into more slides.
- The Summary reads as the whole story in a few lines.
- Every action has a responsible person and a deadline.
- No slide shows May be outdated.
Select Next: Design at the bottom of the page, or press ⌘⏎ (Ctrl+Enter).
FAQs and common issues
Why does editing a slide change Argue?
Each point’s slide is the same point as in Argue. A change in Outline appears there too.
How do I change a Summary line?
Edit the slide headline the line comes from. The Summary headline is your answer, and its lines are the headlines of the other slides.
Does ⌘O open Consider here?
No. ⌘O (Ctrl+O) shows every slide. Use ⌘K (Ctrl+K) and Open Consider to open the guidance.